It's deep winter. The light is low and the internal struggles may be knocking at your door. But I have a weapon against the winter SAD's - STAY WARM and RUFFLE UP.
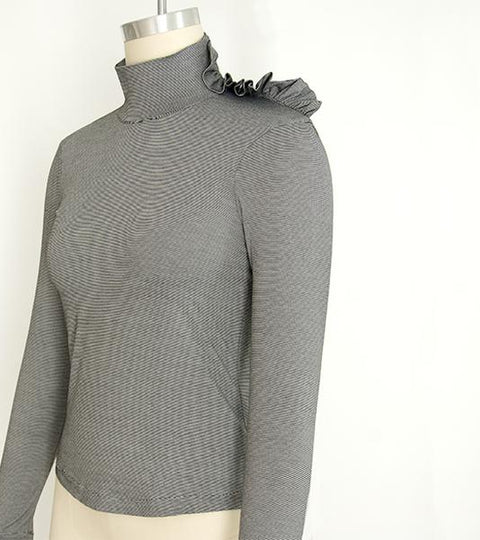
The Glacial is an excellent clean base to add a ruffle without competition from any other design features. Have a look at the blog post on ruffle-making to learn more about what ruffle type could work for your fabric.
For this Ruffle Glacial I was hoping to do a single layer ruffle with a raw rolled edge, but the fabric was unrolling and it looked a bit too raw. So I went for a folded ruffle and the bulk wasn't a problem.
To get the ruffle down the side of the skivvy I had to alter my usual knit neck band insertion method. The key differences are firstly, the CB Skivvy seam went to the wearers left hand side and the neck was eased on whilst the left shoulder seam remained open. Secondly the ruffle was inserted into the skivvy seam and the seam allowances concealed inside the skivvy.
Here's the how-to step-by-step:
- Establish the skivvy band width.
The skivvy neck needs to be eased on and with the knit neck band insertion method you have the opportunity to measure your neck piece exactly for your fabric.
This particular fabric had a bit of Lycra in it which gave it enough stretch to be cut very close to the neck and yet still stretch over my big head.
A. wrap the cut and folded Skivvy piece around your neck until you have the desired neck width.
B. pin width and attempt to take off over head (please don't take out an eye with a pin)
C. cut skivvy to length, including seam allowance of 1 cm each end.
- Prep back neck as per tee shirt making blog tutorial.
- Sew right hand shoulder seam.
- Lay neckline of garment flat with left shoulder seam open.
- Start easing skivvy neck along back neck. Stretch as you go.

- Mark with pins the centre back neck, right shoulder seam, centre front and left shoulder seam on skivvy.
- Lay out skivvy neck and check that CB and CF neck marks are centred.

- Clip small notch at pinned points.

- With skivvy folded, pin to neck line of body.
- Clip into seam allowance and flip back corners of inside of skivvy neck piece. Keep all of external skivvy pinned to body.

- Baste stitch skivvy to neckline. Dodging the flipped up corners so the external skivvy is completely attached.
- Check that easing is alright - remove any puckers.
- Overlock or straight stretch stitch skivvy to neck. Keeping the corners flipped up to clear the sewing line.

- Edge stitch seam allowance to body. Still with corners flipped up internally.

- Get pre-gathered ruffle.
- Pin ruffle to external skivvy and shoulder seam. Keep ruffle 2 cm clear of raw edge of shoulder seam and 1 cm clear of skivvy fold line.

- With the inside of the skivvy flipped out (awkwardly) baste whole length of skivvy seam together, capturing the ruffle on the external half.
- Bag out skivvy and check for puckered etc.
- Turn inside out again and overlock or stretch straight stitch.
- Turn right sides out.

- On internal neck seam turn under seam allowance of opening.
- Hand sew opening shut. Leaving plenty of slack in thread so you can stretch over your head.

- Finish the rest of the Glacial as per the tee-shirt construction tutorial.


Of course this whole process is made possible with the Glacial Pattern and the Stretch sewing kit.
0 Comments
There are not comments yet. Be the first one to post one!