Choosing the right size for your Celestial Dress-
The main fit point for the Celestial is the yoke line.
The main fit point for the Celestial is the yoke line.
1. Select your usual size on the size chart here.
2. In the chart below the shoulder to yoke seam measurement is listed by size.
3. Circle your selected size and measurements.
| Size | Shoulder seam to front yoke seam | Shoulder seam to back yoke seam | Yoke circumference finished measurement |
| 6 |
18.3 cm 7 3/16" |
22.2 cm 8 3/4" |
76.4 cm 30 1/16" |
| 8 |
18.8 cm 7 5/16" |
22.7 cm 8 15/ 16" |
81.4 cm 32 1/16" |
| 10 |
19.3 cm 7 5/8" |
23.2 cm 9 3 /16" |
86.4 cm 34" |
| 12 |
19.8 cm 7 13 /16" |
23.7 cm 9 5/16" |
91.4 cm 36" |
| 14 |
20.3 cm 8" |
24.2 cm 9 1/2" |
96.4 cm 37 15/16" |
| 16 |
20.8 cm 8 3/16" |
24.7 cm 9 3/4" |
101.4 cm 39 15/ 16" |
| 18 |
21.3 cm 8 3/8" |
25.2 cm 9 15 /16" |
106.4 cm 41 7/8" |
| 20 |
21.7 cm 8 9/16" |
25.7 cm 10 1/8" |
111.4 cm 43 7/8" |
| 22 |
22.1 cm 8 11/16" |
26.1 cm 10 1/4" |
116.4 cm 45 13/16" |
| 24 |
22.5 cm 8 7/8" |
26.5 cm 10 7 /16" |
121.4 cm 47 13/16" |
| 26 |
22.9 cm 9" |
26.9 cm 10" |
125.4 cm 49 3/8" |
4. Mark the same measurements on your body with a bit of tape or pen. You will need some help to mark the back.
5. Measure above your bust / yoke line, note the measurements.
6. Add ease (see tip below) to this measurement.
6. Compare this new measurement to your chosen size, from the chart in the last column.
*You want the yoke line to have 1.5-2.5 cm • 9/16- 1" ease. ( "Ease" means a little bit bigger than your body)
If you are making it in a thicker fabric, go for 2.5 cm • 1"of ease.
If you have 4- 5 cm - 1 9/16 - 2"of ease and want the yoke narrower the most uncomplicated adjustment is to remove 3-4 mm • 6/16" off the centre front and centre back fold lines. Including the yokes and facings.
 The full bust is the next critical fit point, it will fit most up to an "E cup" but as cup sizing is wildly different from brand to brand and cup sizing standards do not always translate to garment fits, I recommend taking your own measurements.
To check the pattern has enough room in the bust for you?
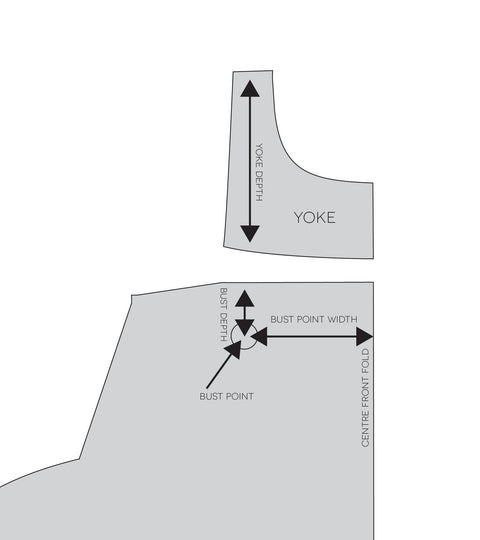
1. Establish your bustline (nipple) depth to compare where your bust line sits in the Celestial dress.
2. Measure vertically from your centre shoulder line - where a bra strap might sit to your bust line.
Note measurement =
3. Measure just the front bust line, from where your side seams should sit over the width of your bust.
4. Half this measurement as you are working on half the pattern
Note measurement=
 6. Measure the same points on the pattern to compare.
7. Lay front yoke and front skirt out flat.
Note measurement=
6. Measure the same points on the pattern to compare.7. Lay front yoke and front skirt out flat.
8. Measure the same distance vertically from centre shoulder to yoke line- excluding the seam allowances.
9. Measure the remainder of your bust depth on the skirt.
10 . Draw a horizontal line from the CF foldline at the same depth as your bust line.
11. Measure the front horizontal bust line on the pattern. The pattern should be 5 mm • 3/16" to 1 cm • 3/8" bigger than your bust, for the front only. You are still working on just half of the front.
If it's bigger this is fine, the yoke will fit, and the skirt will fall nicely. If the pattern is smaller, you can add a dart to create the extra room.

A Full Bust Adjustment
1. Measure the distance between your bust points (aka nipples). Half this measurement and mark clearly along the horizontal bust line from the centre front fold on the pattern.
2. Draw a vertical line through the bust points to the hem to the yoke line.
3. Draw a new line from side seam to bust point. This is your dart.
* The line can start anywhere along the side seam, but the angle created by the dart line will impact the dart depth and subtle shaping. For beginners, a 2-5 cm • 13/16 "- 2" below the bustline is an excellent place to start. 4. Cut the new dart line to bust point and continue cutting across the bust line to CF Fold line.
5. Cut into the vertical line that travels through the bust point from hem to yoke.
6. Open the bust to add in the required width and if needed depth for your bust.
How much?
7. With your previously measured front bust (half) add ease of .5 cm -1 cm.
2. Draw a vertical line through the bust points to the hem to the yoke line.
3. Draw a new line from side seam to bust point. This is your dart.
* The line can start anywhere along the side seam, but the angle created by the dart line will impact the dart depth and subtle shaping. For beginners, a 2-5 cm • 13/16 "- 2" below the bustline is an excellent place to start.
4. Cut the new dart line to bust point and continue cutting across the bust line to CF Fold line.5. Cut into the vertical line that travels through the bust point from hem to yoke.
6. Open the bust to add in the required width and if needed depth for your bust.
How much?
7. With your previously measured front bust (half) add ease of .5 cm -1 cm.
8. Widen the bust line to measure the same (excluding 1 cm seam allowances).
* If you are adding more than 1.5 cm • 9/16", it's better to distribute this over two darts. Otherwise, they will be too deep and look clunky.
9. Keep the hem and yoke line connected and pivot the top and bottom sides out until the gap created is the width of what you want to add—pivot from the 1 cm • 3/8 " seam line, do not the cut edge of the pattern.
10. Add length extra length to the bust. Separate the vertical bustline and make a gap of the same size as one added across the bust this will deepen the dart again.
11. Draw your dart in from side seam to bust point.
* The bust point remains in the same distance from centre front and top of the yoke.
12. Check each leg of the dart is the same length, add to the side seam if they are uneven.
13. Draw a line in the centre of the dart to bust point.
14.Shorten dart length between 2.5cm - 4 cm • 1"- 1 9/16".
* The Yoke line may need a reshape. It's ok if the curvature has changed. Just skim off bumps.

15. Fold dart up with dart excess folded toward the hem.
16. Trim dart tails to align with side seam - this is called proving the dart.
0 Comments
There are not comments yet. Be the first one to post one!